Wednesday, February 6, 2013

DIY Strawberry Scones

One of the interesting things about living in this part of southern China, is that our strawberry season is in the winter. In the summer it rains a lot, but in the winter it is usually quite dry and sunny. So now is the time to make all things strawberry here.

These strawberry scones turned really good. I had to quick freeze a few for Valentine's Day or they would have all disappeared the first day. The strawberry icing really brings out the strawberry flavor.

To make the rest of the recipe really easy first wash and hull strawberries and puree enough in a blender to equal 1 cup of strawberry puree to divide for the recipe. If you puree too much you can always make smoothies. :)

Homemade Strawberry Scones


  • 2 1/2 cups flour
  • 1/2 cup sugar
  • 3/4 cup strawberry puree
  • 1/2 cup oil or melted butter
  • 1 egg
  • 1 Tbsp baking powder 
  • 1 tsp vanilla
  1. Mix all ingredients together in a large mixing bowl until well combined.
  2. Divide dough in two, and press or roll out into circles (or a giant rectangle on a 9x13 pan) on greased pans until about 1/2 inch thick. (Here are more pictures of making scones.)
  3. Score into about 16-18 total triangle-shaped scones.
  4. Bake at 400 F for about 15 minutes until just lightly brown.
  5. Remove from oven, and let cool.
  6. Make strawberry powdered sugar glaze.

Homemade Strawberry Powdered Sugar Glaze


  • 1 1/4 cup powdered sugar (approximately)
  • 1/4 cup strawberry puree (approximately)
  1. Mix together strawberry puree and powdered sugar. To get desired consistency it may be necessary to adjust the amounts of wet or dry ingredients. If the icing is too dry and you don't have any more strawberry puree, you can add a little milk a teaspoon at a time also.
  2. Drizzle on top of scones.
Makes 16-18 scones. 


Monday, February 4, 2013

Mandarin Mondays: Country Sids of the Sea (The Chinglish Files)


Thursday, January 31, 2013

DIY Fabric Heart Garland

I've been doing some more sewing lately. After doing some very functional sewing of diapers and mending I wanted a quick and easy project just for fun. This simple heart garland came together really fast and makes me smile.

Easy Homemade Valentine's Day Heart Garland


  • Assorted fabrics that won't fray easily (I used felted wool and fleece)
  • Sewing machine (although you could do this by hand with a needle, it would just take longer)
  • Thread
  • Scissors
  1. First I cut out a bunch of hearts free hand. The shapes and sizes vary slightly, but I kind of like it that way. I did make the same number of each fabric.
  2. Then I arranged them in the order I wanted to sew them in a big stack. I choose to make a repeating pattern since the shapes and sizes vary some.
  3. Then I sewed  them together using a straight stitch on the sewing machine. I started sewing point first and then just lined the next one up right behind. For them to feed into the machine smoothly, it seemed to work best to sew them point first and over lap them slightly with the next heart just under the one being sewn.
Once you have sewn all of the hearts together, you can hang it up and smile.


Wednesday, January 30, 2013

DIY Strawberry Jam Coffee Cake

"Why is it a coffee cake, when there is no coffee in it?" wondered my then three-year-old ever inquisitive eldest son when I first made this coffee cake.

Well, this cake goes great with coffee, but even if you don't like coffee (and my husband hates it) you'll love this cake. It goes great with tea, cocoa, or just by itself.

Homemade Strawberry Jam Coffee Cake Recipe

Cake
  • 2 cups flour
  • 1 cup sugar
  • 1 tsp baking powder
  • 1 tsp baking soda
  • 2 eggs
  • 1/2 cup oil
  • 1 cup yogurt
  • 1 tsp vanilla
  • 1/2 tsp almond extract (optional but very good)
Strawberry Layer
  • 1 cup strawberry jam (homemade or store bought)
Streusel Topping
  • 3 Tbsp cold butter (cubed)
  • 1/2 cup flour
  • 1/4 cup sugar
Optional Icing
  • 1 1/4 cups powdered sugar
  • 2-3 Tbsp milk
  • 1/2 tsp almond extract (optional but very good)
  1. In a mixing bowl combine all cake ingredients and mix until well combined.
  2. Spread cake batter in a greased 9x13 pan.
  3. Dot the top of the cake batter with spoonfuls of strawberry jam.
  4. For the streusel topping cut together ingredients with a pastry blender and then sprinkle on top of the cake.
  5. Bake at 350 F for 30-40 minutes or until a knife inserted into the center of the cake comes out clean.
  6. Mix together icing ingredients and drizzle on top of baked cake if desired.
Makes one 9x13 coffee cake.


Tuesday, January 22, 2013

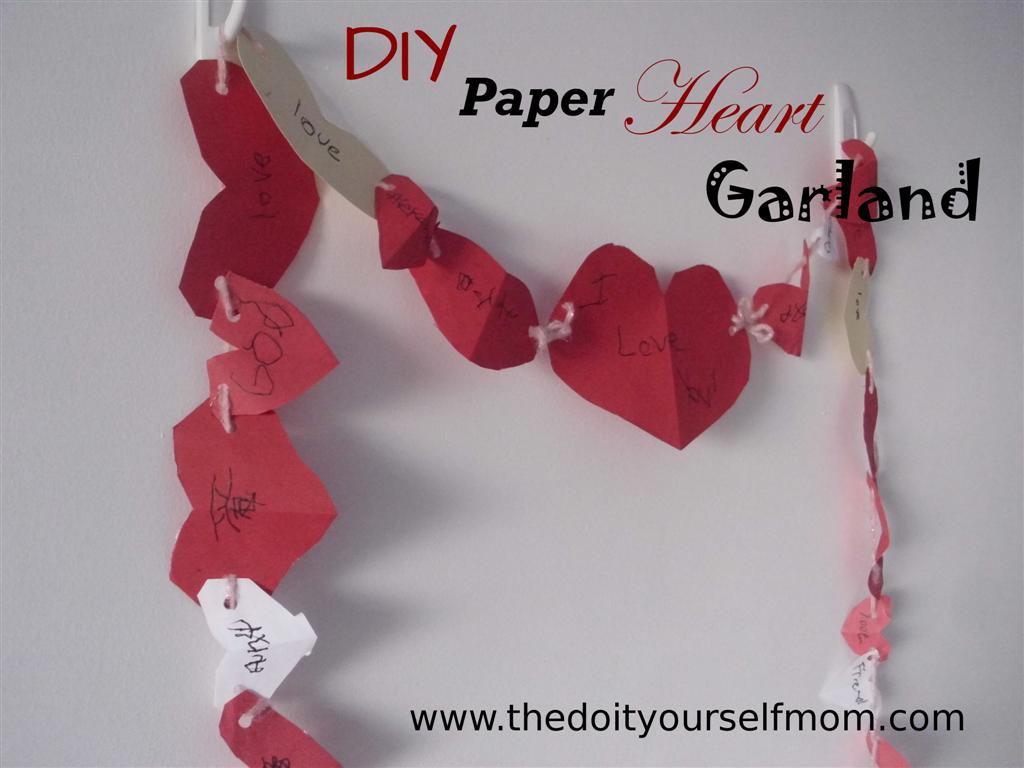
DIY Paper Heart Garland (Valentine's Day Decoration and Preschool Activity in One!)

Lately, if you tell my 4 1/2 year old you are going to do something (and it is something he wants to do) he will just keep asking you about it until it actually happens. So we made this paper heart garland a bit earlier than I had intended. That's OK, we'll just enjoy it a little longer.

Our version looks quite a bit different than the picture perfect Real Simple version that I got the inspiration from, but in the end I definitely like ours better, because my boys did all of the cutting, tracing, and stringing themselves. My 4 1/2 year old did all of the cutting, and my 3 year old did most of the stringing.

Also, my 4 1/2 year old was the one who decided we should write on all of these hearts. I wrote the words and he traced over them. We started just writing love and then added ἀγάπη (agape, love in Greek) and 爱 (Ài, love in Mandarin). Then we wrote a bunch of people we love (our family names, grandparents and extended family, friends, etc.). You could also write about what love really is, but I think we're going to do other projects later doing that.

Homemade Paper Heart Garland

  • Paper
  • Yarn or string
  • Tape and/or plastic straws for "sewing" (optional, but makes it a lot easier)
  • Scissors
  • Hole punch
  • Pencil
  • Markers (optional)
  • Other embellishments like stickers if desired
  1. Trace half hearts onto folded paper and let a preschooler who can be trusted with scissors cut them out.
  2. If desired write and/or trace words on the hearts.
  3. If desired put on stickers or other extra embellishments.
  4. Punch a hole on each side of the heart.
  5. String hearts onto yarn or string to make a garland. (I threaded the yarn through part of a small plastic straw that I cut at an angle for a "needle." This made "sewing" the hearts together much easier. You can also tape around the end to just make it a little stiffer, like the end of a shoelace.)
  6. Tie off and hang up the garland to enjoy.
You can see pictures of the steps below.


Sunday, January 20, 2013

DIY No Bake Chocolate Pot De Creme

This dessert is like eating truffles with a spoon. It is rich and chocolatey and amazing. I like this version because there is no baking or water baths to mess with.

Well unless you decide to share with your kids, then you will need a bath to clean them up, because they will lick the bowls clean, but their faces will be full of chocolate.

Homemade No Bake Chocolate Pot De Creme Recipe

  • 6 egg yolks
  • 1 cup milk
  • 1 cup cream
  • 8 ounces dark or semi-sweet chocolate chopped or use chocolate chips (use a chocolate you enjoy eating without any extra sweetener, because there is no sugar in this recipe)
  1. Place chopped chocolate in a heat safe mixing bowl and set aside.
  2. In a saucepan slowly heat milk and cream.
  3. In a small mixing bowl whisk egg yolks.
  4. When the milk and cream begins to bubble at the edges, slowly add half to the egg yolks while whisking steadily. This tempers the egg yolks and prevents them from turning into scrambled eggs. Then add the yolk mixture to the saucepan and heat slowly until it begins to bubble at the edges again and thickens.
  5. Remove from heat and pour over chopped chocolate (though a strainer if necessary to remove any chunks of egg).
  6. Allow to sit for a minute and melt chocolate and then stir until smooth.
  7. Pour into individual serving dishes (small bowls, ramekins, jars, espresso cups, etc.).
  8. Refrigerate for several hours or overnight to set.
  9. Serve topped with whipped cream if desired.


After eating, bathe small children.
Makes 6-8 small but decadent servings.

LinkWithin

Related Posts Plugin for WordPress, Blogger...