Wednesday, October 30, 2013

DIY Pumpkin Trifle

We love pumpkin around here. Pretty much anything with pumpkin in it we like. But this pumpkin trifle is amazing.

I like pumpkin pie, but I love this pumpkin trifle... Even if you don't like pumpkin pie, you should try pumpkin trifle, because it really is awesome.

I think it would be a great choice for Thanksgiving or Christmas if you wanted to serve something pumpkin, but didn't want to serve traditional pumpkin pie. Make it in a trifle bowl or in individual glass jars, either way makes a great presentation.

Homemade Pumpkin Trifle Recipe


  • Pumpkin bars (bake in a 9x13 cake pan for a trifle bars or in muffin tins for sliding into glass jars)
  • Pumpkin pudding (one batch makes 3 cups which is plenty for this recipe)
  • Whipped cream (at least 1-2 cups whipped) or whipped topping
  • Chopped walnuts or chocolate chips would be great additions as well if you wanted to add some crunch
  1. Layer prepared ingredients starting with pumpkin bars and ending with whipped cream or additions. Repeat layering until you reach the top of the container. Sprinkle a little cinnamon on top if desired.
  2. Chill at least 2 hours before serving to allow flavors to meld.


Monday, October 28, 2013

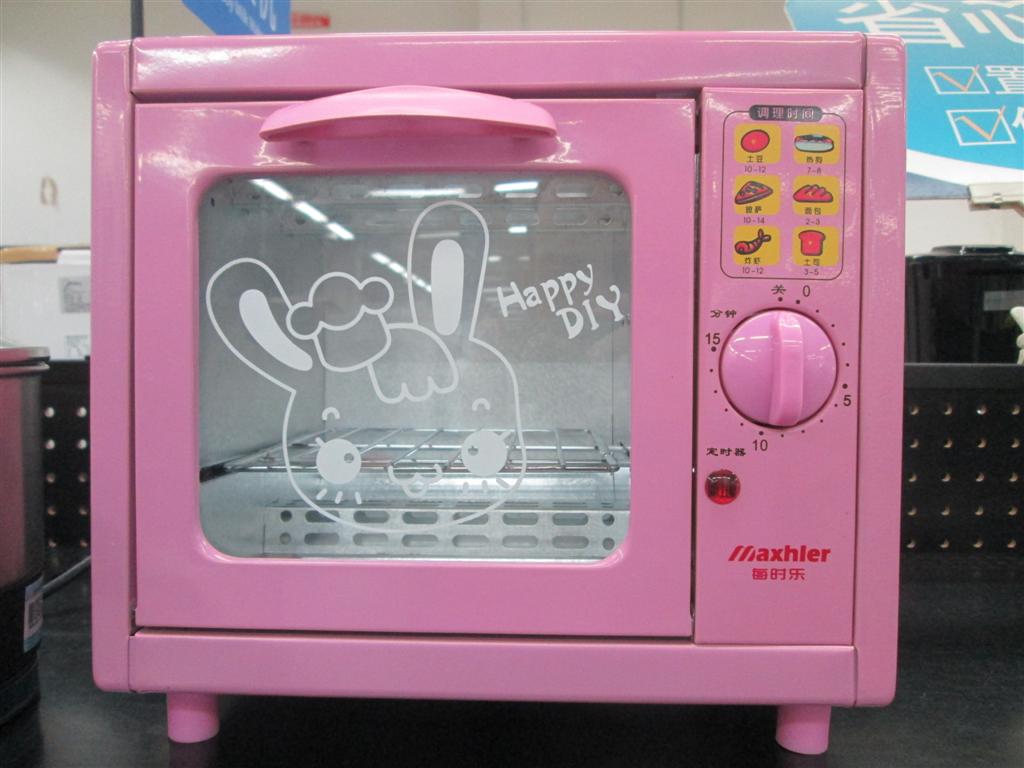
Mandarin Mondays: Happy DIY (The Chinglish Files)

This Happy DIY is the largest (and only) oven of any kind at Walmart.
It is about the size of an easy bake oven.
You could fit 1 or 2 cupcakes in it.
But it is sold among regular kitchen appliances and marketed to adults.

Friday, October 25, 2013

DIY Snowman Soup (Marshmallow Snowmen and Hot Chocolate Mix Recipe)


As the weather gets cooler, hot chocolate sounds more and more inviting. Making snowman soup is a great activity to perk up little kids on a dreary day. This would make a great snack for preschoolers (as long as the hot chocolate wasn't too hot of course).

Setting out marshmallow snowmen and hot chocolate at a party is also fun. And packaging up a few snowmen, hot cocoa mix, and a few chocolate spoons would make a great holiday gift.

Marshmallow Snowmen


  • Marshmallow in three progressively smaller sizes (I used homemade)
  • Orange sprinkles for noses
  • Chocolate sprinkles for eyes
  1. Push two chocolate sprinkles into the smallest marshmallow for eyes and one orange sprinkle for the nose.
  2. Stack up marshmallows like you are building a snowman.
  3. Wrap individually in plastic wrap or cellophane bags if giving as a gift or add straight to your hot cocoa to make snowman soup.

 Fresh Hot Chocolate by the Cup

  • 1 cup milk
  • 1-2 Tbsp cocoa powder
  • 1-2 Tbsp sugar
  • Dash of vanilla and/or salt if desired
  1. Heat milk in microwave or small saucepan, until just bubbling around the edges (not a rolling boil).
  2. Remove from heat and add remaining ingredients, adjusting to personal taste.
  3. Add a marshmallow snowman to make snowman soup or top with whipped cream if desired.

Basic Hot Cocoa Mix Recipe


  • 1 cup dry milk powder
  • 1 cup powdered coffee creamer (can used flavored to make flavored hot cocoa or even just another cup of dry milk powder)
  • 3/4 cup cocoa powder
  • 1 1/2 cups sugar
  1. Blend powdered milk in the blender to make it dissolve more easily and look less chunky.
  2. Either blend all other ingredients as well to mix, or layer in a jay to create a sand art type effect for gift giving.
  3. Store in airtight container.
  4. To serve boil one cup of water and mix in 2-4 Tbsp hot cocoa mix.
  5. Add a marshmallow snowman to make snowman soup or top with whipped cream if desired.


Wednesday, October 23, 2013

DIY Pumpkin Pudding

It fall again and that means it is time to make all things pumpkin. This versatile pumpkin pudding is fast becoming a fall favorite around our house.

This pumpkin pudding is great by itself, with a little whipped cream, and in other desserts.

It is probably the best pudding I have ever had in terms of being great at any temperature. Serve it warm on a cold winter night, cold from the fridge, or freeze as you would ice cream and make a great frozen custard.

Homemade Pumpkin Pudding Recipe

  • 3/4 cup sugar
  • 2 cups whole milk (divided)
  • 1 cup pumpkin puree (homemade or store bought)
  • 2 eggs
  • 1/4 cup cornstarch
  • 1 tsp vanilla 
  • 1/2 tsp cinnamon
  • 1/4 tsp nutmeg
  1. In a small mixing bowl, begin by stirring together 1/2 cup milk, eggs, and cornstarch until well combined.
  2. In a medium saucepan, combine 1 1/2 cups milk, pumpkin, sugar, vanilla, cinnamon, and nutmeg. 
  3. Stir over medium heat to warm the milk.
  4. Take a couple of big spoonfuls (1/4 to 1/2 cup) of the warm milk mixture, and add it into the cornstarch and egg mixture. Don't skip this step. This tempers the egg and prevents it from becoming a scrambled egg when adding it into the hot milk.
  5. Pour the cornstarch and egg mixture into the warm milk, and stir quickly to combine well.
  6. Continue to stir over medium heat until the pudding thickens and begins to bubble.
  7. Strain if necessary or desired to remove any lumps or pieces of egg.
  8. You can serve this pudding warm (sounds good in the winter) or chill for at least 2 hours or up to 2 days and serve it cold.

Tuesday, October 22, 2013

DIY Corn Husk Bouquet

This idea is so simple, but I really like how it turned out. I had my husband and sons go out to gather some leaves and things for fall decorating and craft projects.  When I saw these I thought they would fit perfectly into my glass vase. I love the touch of fall that it add to our kitchen.

The corn husk bouquet adds a lot of vertical interest and I think it complements our scrappy fabric pumpkins nicely.

And you can't beat the price at free.


Want to learn how to make the pumpkins?

Friday, October 18, 2013

Sweetest Holiday Preschool Activity: Play Dough Love Letters


If you want to do a really simple preschool activity for Sweetest Day, Valentine's Day, or any other lovely holiday, consider making play dough love letters. You only really need play dough (homemade or store bought) for this activity and you can easily customize it to many kids ability levels.

All the kids will get some exposure to written letters and words and have some fun in the process. this is a great multisensory activity for reading and writing. A visual, kinesthetic, and tactile experience that also helps build hand muscle strength through working with the play dough.

If you really want to thrill the kids and turn this activity into snack time as well, you could use edible chocolate play dough!

Sweetest Day or Valentine's Day Preschool Activity: Play Dough Love Letters

  • Play dough (homemade or store bought)
  • Rolling pins, cookie cutters, plastic knifes or scissors, chopsticks, etc. (totally optional)
Give each child a lump of play dough and whatever instructions you want them to follow.

The youngest children who can't really follow instructions yet can play with play dough in festive holiday colors.

Young children can try to make hearts or single letters. My second born age three at the time could do this quite well.

Older children can spell out entire words or phrases. You can write them on a blackboard or magnetic writer for them to copy if they are still learning how to spell. My firstborn son who was four at the time really got into this activity and kept wanting to spell longer and longer words!


Wednesday, October 16, 2013

DIY Sweetheart PB&J Sandwiches


Makes your littlest sweethearts extra happy this Saturday and serve them heart-shaped sandwiches for Sweetest Day. Last Valentine's Day I served these for lunch and my kids were thrilled. Sometimes it is the little things like having your sandwich cut in a special shape that makes a meal special of a child.

I made PB&J sandwiches like normal and used a giant heart cookie cutter to cut out the center in a heart shape. We ate the outside of the sandwiches the next day. You could a cut the bread ahead of time and save the crusts for breadcrumbs.


Friday, October 11, 2013

DIY Kisses and Hugs Cookies


Send your love ones some hugs and kisses for Sweetest Day. These sweet sugar cookies are a simple way to let them know you love them on Sweetest Day, Valentines Day, your anniversary or anytime of the year.

This sugar cookie and icing recipe paired together beautifully, but if you already have your own family favorites feel free to use those instead.

I didn't have X and O cookie cutters, so I simply cut the dough into even strips and placed two short strips perpendicular on top of one another and pressed down to form an X. For the O I used two different size jars to cut the outside and inside edges of the ring.

This can also be a fun project to do together with kids. Kids love cutting out sugar cookies and painting them.

Do be sure to let the sugar cookies cool completely before icing, and the icing harden completely before stacking or serving for best presentation.

Homemade Roll Out Sugar Cookie Recipe

  • 3 3/4 cups flour
  • 1 1/2 cups granulated sugar
  • 1 cup butter or margarine softened
  • 2 eggs
  • 1 tsp baking powder
  • 1/2 tsp salt
  • 2 tsp vanilla extract
  • 1 tsp nutmeg
  • Milk (if the dough is too dry)
  1. Cream together butter and sugar.
  2. Beat in eggs and vanilla.
  3. Add dry ingredients, incorporating flour about 1 cup at a time.
  4. If the dough is too dry add milk one tablespoon at a time until desired consistency is reached.
  5. Chill in the refrigerator a couple of hours or overnight. I did find that with all real butter though I had to let the dough soften up a bit after chilling it overnight.
  6. Roll small sections of dough at a time to 1/4 inch thick. Cut into shapes with cookie cutters and place on an ungreased baking sheet.
  7. Bake at 400F for 6-8 minutes, until edges just begin to brown.

Powdered Sugar Icing Recipe

  • 1 cup powdered sugar
  • 2-3 Tbsp milk
  • Food coloring if desired
  1.  Place powdered sugar is a small mixing bowl and add milk a Tbsp at a time until a nice consistency. Stir until smooth. Add food coloring if desired.
  2. Drizzle or paint cooled cookies with a food safe brush. Sprinkle with sugar or sprinkles if desired.
  3. Allow to harden for 1 hour before stacking or serving.


Wednesday, October 9, 2013

DIY Upcycled Blue Jean Kitchen Towels


Perhaps in going through your fall clothes you have found some jeans you no longer want to keep. Instead of donating  or tossing them, perhaps you can re-purpose the sturdy denim fabric into something else useful.

There are so many great uses for old blue jeans, and these upcycled blue jean kitchen towels are one of them. Sturdy and absorbent these are been great for both hand towels and dish towels.

I think these could even make great gift for a college student or young working adult starting out on their own for the first time!

DIY Upcycled Blue Jean Kitchen Towels

  • Old blue jeans or other denim clothing (I used a bunch of different blue jeans in a variety of weights and sizes for these towels. I also like the look of the flat felled sea
    ms, so is doesn't bother me at all to have them in the middle of my towels, but if you didn't want seams you could reuse denim skirts or something else with more seam-free material.)
  • Coordinating thread
  • Scissors
  • Sewing machine, preferably with a sturdy jean needle
  1. Cut the denim into a square or rectangle in the size you desire, adding 1 inch around the entire perimeter for the hem allowance. I basically used the entire width of whatever jean legs I had and made rectangles. I had smaller size jean legs that I made smaller (and closer to a square like shape) towels for drying our hands, and larger jean legs that I made large rectangular dish towels out of. I also chose to use lighter weight denim for the dish towels and heavier weight denim for the hand towels, and I'm happy with all of these choices, but of course choose what is best for you out of what you have to work with. Cut a 4 by 6 inch piece to use for a loop for hanging the towel.
  2. Fold the edges of the 4 by 6 inch piece in 1 inch and then in half to make a 1 by 6 inch strip with finished long sides. You can iron the strip before you sew if you like. I don't in part because I don't have an iron, and mostly because I hate ironing.
  3. Now you want to sew a double rolled seam around the perimeter of your towel, inserting each of the ends of the strip a couple inches from the edge of one corner. You may want to clip small squares out of the corners and some of the seam allowance out of the flat felled seams where you will be sewing over them to reduce the bulk and make it easier for your machine to sew over them. Just make sure not to clip to far and end up with a fraying hem. Again you can iron ahead of time if you like.
  4. After you round the last corner and back tack, simply clip any loose threads and your ready to enjoy your towels!
Such a quick, easy, and useful project.

I'm loving having a whole new set of coordinating kitchen towels that go great in our blue and white kitchen. :)


O


Sunday, October 6, 2013

Alexander is 1 Year Old!

Baby boy is one year old today! Amazing. It seems like he was just born.

At 1 year Alexander:
  • Is 23.5 pounds and 31.75 inches
  • Is wearing 18-24 month clothes
  • Is still talking, signing, and babbling away  with the same words he has been
  • Is walking! ( He was taking a couple of steps here and there, but the day before his birthday he started taking about 8 or so steps in a row quite a few times)
  • Loves to play ball
  • Initiates playing peek a boo and thinks it is hysterical
  • Makes animal noises
  • Can read "The End" (He claps like we do when we get to the end of a set of flashcards)
We're so blessed to have him as part of our family.


LinkWithin

Related Posts Plugin for WordPress, Blogger...