Wednesday, August 10, 2011

Extra Income Earning Activity: Join Swagbucks

Have you heard about Swagbucks? They are are a online reward company that rewards you for simple things you are probably already doing online. The easiest way to earn Swagbucks is by searching online through their search engine. I search everyday anyway, by searching with Swagbucks I can earn a little extra money; although I still think Google is a better search engine. By searching through the Swagbucks site or using their toolbar you will randomly be awarded Swagbucks up to several times in a day. You can then redeem these Swagbucks for prizes, including Amazon Gift Cards and cash through PayPal.

They have a lot of other activities that you can also do to earn Swagbucks. The Money Saving Mom did a good series about them here. One other way you can earn Swagbucks is by referring others, you can earn matching Swagbucks for all of their search and wins up to 1000 Swagbucks.

They recently have just started allowing more than one account per household also, so even more people can earn Swagbucks. And if you are not already a member in addition to the normal 30 Swagbuck sign up bonus you can earn a 50 Swagbuck bonus if you sign up and use the code AUGUSTBONUS through Friday, August 12.

(Note: Links in this post are affiliate links. Read my disclosure policy here.)

Disclosure and Privacy Policy

Disclosure Policy

The main purpose of this blog is to help others by sharing what I have learned to make myself and keep others up to date about what our family is up to. I am really enjoying this process, and it is helping with my own organization as well.

However, I am also including ads and affiliate links on this blog in hopes that is may earn a little extra income for our family eventually. When you use these links, I may receive some small compensation from these companies. All views and opinions presented here are always completely my own; I simply want to live with integrity and to be up front and honest about everything on this site.

Privacy Policy

This blog does not share personal information with third parties nor do we store any information about your visit to this blog other than to analyze and optimize your content and reading experience through the use of cookies.

You can turn off the use of cookies at anytime by changing your specific browser settings.

We are not responsible for republished content from this blog on other blogs or websites without our permission.

These policies are subject to change without notice and were last updated on January 8, 2013.

As always feel free to contact me at anna@thedoityourselfmom.com with any questions or concerns.


Glad that's done, now these cookies are more fun to talk about!

DIY Corn Syrup

I don't regularly buy corn syrup and don't really like to have it in our diets anyway. But I came across a couple of recipes for art supplies that I wanted to try now, and some special treat recipes to possibly make for the holidays that called for corn syrup. I also have no idea if I could actually buy it anywhere in Kunming. So, I learned how to make my own. I am not sure if this is much healthier than regular corn syrup (because the cream of tartar is supposed to breakdown the sugar to simple sugars that prevent crystal formation), but if you have corn allergies, can't get corn syrup, or just don't want to buy something you rarely use, this is a great alternative.

Homemade Corn Syrup Substitute Recipe

  • 2 cups of sugar
  • 3/4 cup of water
  • 1/2 tsp cream of tartar
  • 1/4 tsp salt
  1. Mix all ingredients in at least a 2 or 3 quart (or liter) saucepan. The syrup really bubbles up at first and you don't want burning hot syrup bubbling up onto you or your counter.
  2. Slowly bring to a rolling boil, while stirring constantly.
  3. Reduce heat and simmer until thickened to soft ball stage. To determine soft ball stage use a candy thermometer (soft ball stage is is 235-240 F at sea level*). At soft ball stage, the syrup will form a soft ball when a drop is dripped into cold water. This ball will flatten when taken out of the water.

*If you forget that you are cooking at a high altitude, and that this effects not only baking but boiling temperature, like I did, and you keep trying to cook the syrup to this temperature, the syrup will definitely smoke and burn. At that point you will need to throw that batch out, carefully because it is amazingly hot. then you will need to start over. And if you are running low on sugar you may decide to reduce all amounts and make a tiny test batch, which is why my jar of syrup is so small. I then made sure to test the stage of the sugar syrup by dripping a small amount in cold water. This worked much better. My small test batch turned out amazingly well though, thick and really sweet like regular corn syrup, so it was a resounding success. And the tiny batch made enough for the watercolors and glue that I wanted to make now anyway, and they turned out great. I'll just have to make more syrup when I need it next. At least now I know how to do so without smoking up the kitchen.

This regular recipe makes about 2 cups of syrup and is supposed to keep well for up to two months.

    DIY Ice Cream Cones: Making Ice Cream Cones Without a Cone Stand

    Want a cone to put your homemade ice cream or frozen yogurt in but don't have any on hand? Looking for a fun summertime activity? Or just want to make the whole dessert from scratch? Try your hand at making your own ice cream cones from this recipe adjusted slightly from Joy of Baking. They taste really good and are like a cross between a crepe and a sugar cone. It is a little tricky to get the hang of cooking the batter and rolling the cones. But if all else fails, line a bowl with them and call it a waffle crepe bowl. Bowl shaped cones are also less messy for little kids. The taste of these cones is so good that it makes up for any imperfections in presentation and makes it hard to go back to store bought cones.

    Ice Cream Cone Recipe 

    • 2 large eggs
    • ½ cup sugar
    • ⅓ cup flour
    • ¼ cup oil
    • ¼ cup milk
    • 1 tsp vanilla or other extract (almond is excellent)
    1. Whisk together eggs and sugar.
    2. Add the rest of the ingredients, and whisk until smooth.
    3. At this point, the batter should be quite thin but not a runny mess. It should be the same consistency as crepe batter. If the batter is too thick add more milk by the tablespoon. If the batter is too thin, add flour by the tablespoon.
    4. Once the batter is whisked smooth and the proper consistency, spay a small frying pan with nonstick spray or brush with oil, and heat pan over medium low heat.
    5. Scoop ¼ cup (or a little less) batter into the warm pan and tilt until a roughly 6 inch circle forms.
    6. Cook until golden brown on one the bottom.
    7. Flip, and cook the other side until golden brown.
    8. Remove from heat, and place it on a plate to cool slightly so that you don't burn your fingers. Then, while still quite warm, roll into cone shape and pinch the bottom so that the cone won't drip.
    9. Place on a wire cone rack, or if you don't have a cone rack, do as I did and twist a clean twist tie around the bottom and place them in a small jar or cup.
    10. Cool completely, and then enjoy with your favorite ice cream or favorite  frozen yogurt.

    (makes 6–8 cones)


    These cones are best eaten immediately but can be stored in an airtight container and then be reheated the next day in an oven (350–400 F for 3–5 minutes) to crisp them up. Then you may need to roll them again. However, I really doubt you'll have any extra. And if you do, you can also just eat them by themselves like cookies.

      Tuesday, August 9, 2011

      DIY Milk Chocolate Frozen Yogurt

      While this chocolate frozen yogurt isn't quite as good as real dark chocolate ice cream, it is still really good. It is easier, cheaper, and healthier too. A great any day dessert.

      Milk Chocolate Frozen Yogurt Recipe

      • ¼ cup cocoa powder
      • ¾ cup sugar
      • 3 cups yogurt (homemade yogurt works great)
      1. Stir all ingredients together until thoroughly combined.
      2. Freeze in an ice cream freezer, or follow these directions to freeze in your regular freezer.
      This recipe makes about 1 quart or liter of frozen yogurt.

        DIY Berry Frozen Yogurt

        This berry frozen yogurt tastes so awesome that it rivals real ice cream in our house. This recipe is even more amazing with homemade almond flavored ice cream cones.

        Berry Frozen Yogurt Recipe

        • 1 cup berries (fresh or frozen)
        • ½ cup sugar (more if your berries are really tart)
        • 3 cups yogurt (homemade works great)
        1. Choose your berries (blueberries, raspberries, strawberries, etc.), and wash them if they are fresh. For this batch, I used a combination of mulberries and Chinese waxberries (yǎ měi,  雅美). Yǎ měi taste like a combination of cranberries and raspberries. This was a really good combination. I think blueberries and raspberries together would produce similar results, but any kind of berry should be good.
        2. Mix berries, sugar, and one cup yogurt in a blender until smooth.
        3. Stir in the rest of the yogurt. This keeps the mixture from getting to thin.
        4. Freeze in an ice cream freezer, or follow these directions to freeze in your regular freezer.
        This recipe makes about 1 quart or liter of frozen yogurt.

        DIY Peach Frozen Yogurt

        White peach frozen yogurt
        (you can see the small pink flecks of skin)
        Light and refreshing, this fruity frozen yogurt is a real winner around here. Aaron even choose it over chocolate one night.

        Peach Frozen Yogurt Recipe

        • 1 cup peaches
        • ½ cup sugar
        • 3 cups plain yogurt (homemade works great)
        1. I used fresh peaches, so first I removed the pit and sliced them. I didn't bother to peel them, because I am lazy and don't like to peel fruit when it isn't necessary. You can also use canned or frozen peaches if you don't have fresh.
        2. Put peaches, sugar, and 1 cup yogurt in the blender, and blend until smooth. This gets all ingredients super-smooth really fast. You can't even taste the peel. You can only see small specks in the yogurt.
        3. Stir in remaining yogurt to prevent thinning the mixture to much.
        4. Freeze in an ice cream freezer or follow these directions to freeze in your regular freezer.
        Recipe makes about 1 quart or liter of frozen yogurt.

        Monday, August 8, 2011

        Mandarin Mondays: 二手市场

        I mentioned last week that some of the furniture available at the second hand market (èr shǒu shì chǎng, 二手市场) is better quality than a lot of the cheap new stuff and that we are excited to have purchased some furniture from there to finish furnishing our home.

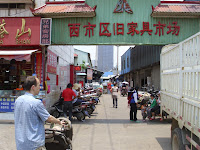
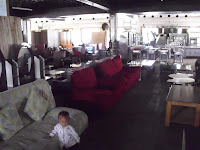
        The second hand market near us is a very unique place. It is almost hard to imagine if you haven't been to something like it. You see, it is like a small villiage inside the market. People sell furniture (jiā jù, 家具), appliances (jiā diàn, 家电), and kicthen (chú fáng, 厨房) items, but they also live there. In the back of a lot of the shops are beds that aren't for sale, because they are used by the sellers. This in effect is their home (jiā, 家).

        When you go there, people are cooking (zuò cài, 做菜) their food (shí wù, 食物) over open flame, right in the middle of the isles. Children are running and playing all over, except for the littlest ones, who are either being held or are tied to someone's back.
        Visiting a place like this makes us realize all over again how blessed we really are. In this city, most people have a lot of stuff. Most people in our apartment complex actually have a lot more material goods than we do. We recently saw someone moving out of an apartment above us and they literally filled a large (probably equivalent to 12 passenger van in the states) with clothes (yī fú, 衣服). Most people in the city are searching for fulfillment in material things that can never bring true happiness. We are blessed in so many ways that aren't tangible on this earth, and we don't envy those who have more things than us. However, visiting areas where they don't have so many possessions makes you even more thankful for everything we do have.

        It also makes it even harder to want to bargain for a better price. Everyone knows that we are very frugal, and no one wants to get ripped off; but at the same time, you know the people they don't have much. At least as a foreigner, you know that you will almost always be paying more than a local person at these types of markets.

        After you bargain back and forth, and finally agree on a price, you have to arrange for delivery (chuán sòng, 传送). Usually, someone who delivers will be following you around everywhere and as soon they see you making a purchase (or even get close to purchasing something) they'll be asking if you need delivery. Then you have to negotiate a price for delivery.

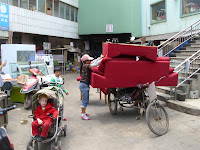
        The price of delivery may depend on whether it delivered by truck (kǎ chē, 卡车)or by tricycle (sān lún chē, 三轮车). When we got our table, desk, and chairs when we first moved it was delivered by a truck. A young guy who just got his truck and his driver's license delivered it, in fact. That was an experience all in itself. This time a guy with a tricycle cart delivered the two sofas (shā fā, 沙发), and table (zhuō zi, 桌子) we got (for me to use as a desk most of the time). He delivered all of these items in one trip too. Nate jogged along beside him to direct him to the right place.

        After we got them inside our house (wǒ men jiā,  我们家) and cleaned them off, we enjoyed our new furniture, feeling very blessed.

        Friday, August 5, 2011

        Family Fridays: Open House

        Living Room
        Hi everyone, come on in! We're having an open house today. In celebration of getting the last of our furniture, I got the house (virtually) completely clean and took pictures of it all for you to see.

        To your left, you will see the living room. We finally decided to get regular couches after we kept searching for a comfortable, affordable, and not hideous looking foldout couches and finding none.
        Aaron playing in the front Window
        We got the couches at the second hand furniture market. They are quite comfortable and seem to be in really good condition. All of the covers come off and can be washed separately, which is a really nice feature. The couch is way more comfortable than most beds here, so we'll just get air mattresses or foam mattresses when we have more than one visitor.

        Living areas from the front window
        The boys love to play in the front window, especially on sunny days. It does make it a little like living in a fishbowl though, when everyone looks in at us through the big windows all of the time.

        Here is the view from the window looking back at the living and dining rooms.

        Kitchen
        Here is the kitchen. I really appreciate that we have two gas burners, a large toaster oven, a fridge that is about two-thirds the size of a standard US fridge, and a double sink. Each of these features is double the capacity of what we had in our last apartment in China. Except for the sink, which is infinitely more (because previously we had no kitchen sink). It makes cooking much more convenient. Also the fact that there are cabinets and they are somewhat attractive is a feature that is very nice and somewhat hard to come by here as well.

        Cute Andrew reading in his room

        Boys beds
        Here is the boys room that we painted "little boy blue." They like it a lot and have lots of fun playing in there.
        Boys' toys and computer

        Pink sink and me in the mirror
        Shower, washing machine, toilet


        This is the bathroom. Unique special features in this bathroom are a western toilet, a shower that isn't open to the whole room, a small tub in the shower stall, a place to hook up the washing machine, and an extremely pink sink (but we like it because it does have some storage underneath, which is almost nonexistent here).
        Nate working

        The last room to show you is our bedroom. Nate has his computer desk in here as well.

        Bed and hallway
        Well that's it for now! Come back another time, and I'll show you around the the backyard and the gardens in our apartment complex.

        Thursday, August 4, 2011

        August Unit Study: D is for Dinosaur

        The boys love dinosaurs, or as Andrew calls them, "bump, bump," so we decided we'd try to learn more about them for our August unit study. It turns out there are lots of people who love dinosaurs, so there is tons of stuff available online to put together your own unit study.

        We like the cute book D is for Dinosaur by Ken Ham, and the video that goes along with it is good as well; albeit the graphics are now a little cheesy. We also like My Creation Bible and Dinosaur, Genesis, and the Gospel and Creation Adventure Team videos that are also put out by Answers in Genesis as well. They have some other great free resources, including answers to common questions and free audio and video talks as well.

        This month, I wrote out our memory verse (Job 40:15, 19) and made a calender with a quick facts about a dinosaur for each day. For simplicity, I used info and pictures from Enchanted Learning to put it together quickly. This site has some good resources for teaching about dinosaurs and so does the PBS Dinosaur Train site, but they are from an evolutionary perspective, so the content can take some wading through.

        Since the boys went through worksheets and activities so quickly last month, I needed to come up with a way to make them last longer. We bought a book full of clear page protectors, and I put all of the worksheets and small pieces for activities in separate sleeves. This is working very well as they can write on the pages with a dry erase or washable marker, and then I can simply wipe them down and they are ready to be used all over again for the next day. Putting the puzzle pieces and cards in separate page protector has also really helped to keep them organized and not all over the kitchen. This workbook is sort of a mini workbox system. The boys can do all of the worksheets and then move from one activity to another, hopefully getting the first one put away before getting the next out. We probably will need to get a second book for next month though because Andrew wasn't as thrilled with the small worksheets I laminated for him. If his brother had small cards it was fine, but if Aaron has a big workbook, Andrew surely wants one too.

        To fill the workbook, I used free printables from all over the internet. Home School Share has a free creation based dinosaur unit study and lapbook printables. 1 Plus 1 Plus 1 Equals One has dinosaur tot pack with lots of free printables. 2 Teaching Mommies has a free preschool pack with lots of dinosaur themed activities for practicing basic preschool skills. Confessions of a Homeschooler has a Pre-K Letter D unit with lots more dinosaur printables. I found so many great resources that one of the hardest parts was choosing which pages to use from each.

        I even found some dinosaur themed beginning math activities. Mathwire had a simple dinosaur racing game to print which uses a die to learn about odd versus even numbers. File Folder Fun has a couple of matching dinosaur bones games to practice simple addition and subtraction. Learning Page also has dinosaur worksheets, including a few simple math ones.

        We have a few other dinosaur books including one with a dinosaur for each letter of the alphabet that the boys like a lot. And I found a few new silly storybooks about dinosaurs free online. Tyrone the Double Dirty Rotten Cheater, Tyrone and the Swamp Gang, Dinosaurs I Have Known, and I Am Tyrannosaurus are a few that are very fictitious but kind of funny. Again not everything on dinosaurs is written from a completely creation perspective, so parents may need to edit and explain the truth carefully to avoid confusion.

        The boys enjoyed coloring a T-rex and a dinosaur pop up card from Paper Toys. If we get time, I'd love to try to make some more of these dinosaur crafts. The boys boys love to glue things. And if I can find something to represent dinosaur bones, maybe we can have an archeological dig. Combining dirt and dinosaurs, the boys would love that!

        We'll see what we do this month and save the rest for another time.

        LinkWithin

        Related Posts Plugin for WordPress, Blogger...