Showing posts with label decorations. Show all posts

Wednesday, February 8, 2012

Easy Heart Wreath (No Hot Glue Required)


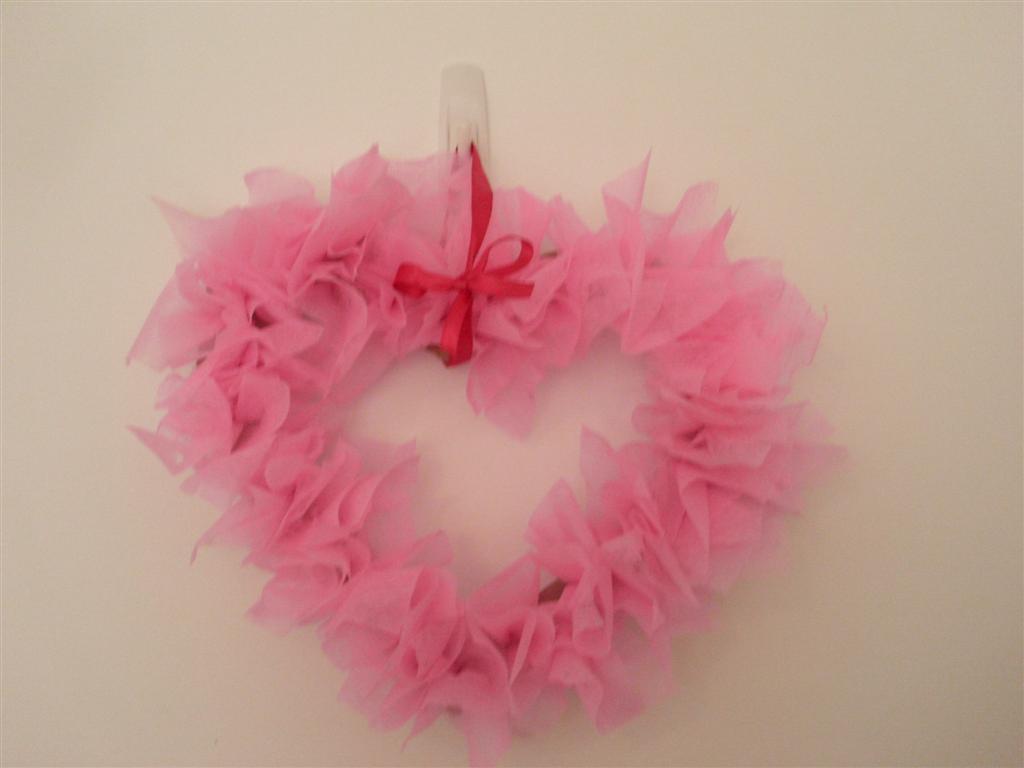
I've seen a lot of cute Valentine's wreaths on the internet, but most of them require the use of a hot glue gun, which I don't have. So I came up with a different way to make a tissue paper heart wreath, without any hot glue.

Easy Tissue Paper Heart or Heart Wreath

  • thin cardboard
  • pink or red tissue paper
  • scissors
  • hole punch
  • ribbon (optional)
  1. Cut the thin cardboard into a heart shape whatever size you like. If you want a wreath, cut a heart shape out of the middle of the larger heart.
  2. Use the hole punch to bunch holes all over the heart shaped cardboard, about 1–2 inches apart.
  3. Cut 3–5 inch squares of tissue paper.
  4. Take a square of tissue paper and twist it a little in the middle and stick in one of the holes. Repeat until the whole heart is covered with fluffy tufts of tissue paper.
  5. You can add a ribbon if you like for hanging on the wall.


Thursday, February 2, 2012

Easy Stuffed Heart Ornaments

For another simple Valentine's Day decoration, I made these cute stuffed hearts. I just cut out 1 heart out of a cute print, 1 heart out of black for the back, and 1 heart out of batting to stuff the heart. I put the print and the black right sides together, and then the batting on the bottom, and sewed around the heart with a small seam allowance, leaving just enough room open for turning. Then I clipped the dip in the top of the heart close to the seam to avoid bunching, turned it right side out, whip-stitched the opening closed, and added a loop of thread to hang it at the top. I top-stitched one of them but decided not to bother with the rest. Really easy, but I thought they turned out really cute too.

Wednesday, February 1, 2012

Easy Beaded Holiday Ornaments

This past Christmas, I made some beaded ornaments for the unique little Christmas tree I made. Now I am going to reuse the hearts for Valentines day decorations. Aaron (3 1/2) even helped a little, but older kids can do these fairly easily on their own. I remember one Christmas where my aunt brought lots of beads and wire and all of us girls, my mom, and my aunt would bead together for hours.

Easy Beaded Holiday Ornaments

  • small beads
  • wire
  • wire cutters
  • pliers

For most of the ornaments that I made this year, I simply strung a long series of beads to cover the wire and then twisted it into the shape I wanted. I then twisted the wire around to make a loop at the top and then twisted it tightly together to secure it. I often left a little extra and made small curls with the pliers. The hearts were one of the easiest shapes to make.

I also made some stars that were a little more complicated. For the points on the stars I made, I strung on a pattern of beads, ending with a large pear shaped bead. Then I put on one more small seed bead and threaded the wire backwards through the pattern of beads, starting with the pear shaped bead and ending with the small beads.

Monday, December 12, 2011

DIY Christmas Decorations: Easy, Low Sew, Pocket Advent Calendar

I realize this is a little late for anyone to be making advent calendars this year, but I made mine a couple days late, and we've been enjoying it ever since then. I simply cut 4 inch squares out of a variety of green fabrics and one brown square for the trunk (Christmas Day). I arranged them in a pattern to resemble a Christmas Tree and hand sewed them on. I have been embracing frayed edges and uneven stitching in our holiday decorations, but you could finish these much nicer if you prefer. I then used fabric paint to paint on 1–25 for the days of the month, but you could embroider, sew on number beads or decals, iron number transfers on, or even just write them on with a sharpie.

The choice of fabrics and how you do your numbers could totally change the look of this calender for any decor.

My husband and I are working on writing a Jesse Tree devotional book for our family this year and I am putting each day's symbol ornament in the pocket for that day. But you could put treats, a verse, a family activity, or even an act of service in each pocket for other ways to celebrate the season. The boys really like our advent calendar, especially because we combine it with a treat in their Christmas stockings as we count down the days to Christmas.

DIY Christmas Decorations: Pine Cone Window Treatments

When we moved around the world by airplane, we decided not to pack non-essentials, like our Christmas decorations. So this year, I have been having fun making our own Christmas decorations with things we already have, or found, and things from nature. My goal is to have a few simple beautiful Christmas decorations to decorate our house with for free. We have a great big curved window in the front of our living room that I thought I try to decorate with some pine cones Nate and Aaron gathered for me.

Homemade Pine Cone Window Treatments


  • Pine cones
  • Thread or fishing line
Simply cut lengths of thread or fishing line, tie one end to the pine cone, and then tie the other end to your curtain rod or tape it to the wall. Vary the height of the pine cones for visual interest.

I really like how the pine cones look, simple and beautiful.

Thursday, December 8, 2011

DIY Christmas Decorations: Jar Candle Luminaries

When we moved around the world by airplane, we decided not to pack non-essentials, like our Christmas decorations. So this year, I have been having fun making our own Christmas decorations with things we already have, items we found, and things from nature. My goal is to have a few simple, beautiful Christmas decorations to decorate our house with for free. I used recycled jars, re-purposed ribbon, broken tile we found and washed, an tea light candles I already had to put together some festive candle luminaries.

Homemade Jar Candle Luminaries

  • Clean Glass Jars
  • Non-flammable decorative filler for the bottom (tiles, marbles, sand, Epsom salts, etc.)
  • Candles (tea lights or votives, small holders optional)
  • Ribbon
  • Extra embellishments to tie on (optional)

Fill the bottom of the jar to the height you desire, and then place the candle inside. Tie a ribbon around the outside of the jar, and add any extra embellishments you like.


    DIY Christmas Decorations: Pine Cone "Chandelier"

    When we moved around the world by airplane, we decided not to pack non-essentials, like our Christmas decorations. So this year, I have been having fun making our own Christmas decorations with things we already have, items we found, and things from nature. My goal is to have a few simple, beautiful Christmas decorations to decorate our house with for free. I have seen blog posts where people decorate their dining room lights with candy or other things, and I thought I try it with some pine cones that Nate and Aaron gathered for me.

    Homemade Pine Cone "Chandelier"
    • Pine cones
    • Thread or fishing line
    Simply cut lengths of thread or fishing line, tie one end to the pine cone, and then tie the other end to you light. Vary the height of the pine cones for visual interest.

    We're not super fond of the actual light fixture here, but it is functional, so we haven't bothered to replace it. But I really like how the pine cone look in our dining room though: simple, natural beauty. And Andrew (our soon to be two year old) loves it too. He keeps saying, "Cone, cone, pretty."

    Monday, October 31, 2011

    DIY Scrap Pumpkin

    This pumpkin takes a little more time to sew than the sew easy or sleeve pumpkin, but it is really cute. It is also a great way to use up small scraps and the odd button or piece of ribbon you might have lying around. You could also use this process with all red fabrics and short green leaf piece like this one to make scrap apples.

    Scrap Pumpkin

    • Fabric scraps in fall colors
    • Green and brown fabric scraps, felt, or ribbon pieces
    • Needle and thread
    • Somthing to stuff the pumpkin with
    • Extra embellishments if desired (buttons, ribbon, lace, etc.)

    1. Cut several strips of fabric the same length to sew into a tube for the body of the pumpkin. For my pumpkin I used four strips of alternating fabric that are the same length and roughly the same width as well. However, you could use more types of fabric, less strips, or vary the widths of the strips as well.
    2. Cut a piece of green sleeve, a green square to sew into a tube, or a green circle to gather for the pumpkin top. Cut a brown strip of fabric, felt, or ribbon to use for the pumpkin stem.
    3. Sew the strips of fabric together to form a square. I then chose to stitch some scraps of orange lace i had on. You could also stitch contrasting fabric scraps on at this point.
    4. Fold the square over and stitch the long side of the square together to form a short tube.
    5. Gather the bottom of the tube, and stitch closed tightly.
    6. Stuff the pumpkin.
    7. Gather the top of the tube, and stitch closed tightly.
    8. Fold over the piece of green sleeve, and gather the unfinished end together, or gather the green circle.
    9. Fold the brown strip together to look like a stem, and stitch into the green pumpkin top.
    10. Whip-stich the green pumpkin top to the orange pumpkin.
    11. Add any extra embellishments you like.

      DIY Sew Easy Sleeve Pumpkin or Apple

      Out of part of the sleeve from the orange shirt I used to sew a larger pumpkin, I made a cute little pumpkin. The way I did the green part on this pumpkin makes it look sort of like an apple though. You could use this process with red fabric to make apples just as easily.

      Sew Easy Sleeve Pumpkin (or Apple)
      • Orange (or red or green) sleeve, or a square of fabric sewn together to make a short tube of fabric
      • Green and brown fabric scraps (or ribbon) for a leaf and stem
      • Needle and thread
      • Something to use for stuffing
      1. Cut out the sleeve or sew a short tube of fabirc.
      2. Cut short pieces of green and brown fabric or ribbon to use for a leaf and stem.
      3. Gather the bottom of the tube, and stitch closed tightly.
      4. Stuff the pumpkin.
      5. Gather the top of the tube, but before closing tightly, insert the brown stem and green leaf. Stitch closed tightly, and stitch through the stem and leaf a couple of times to secure them.

      DIY Sew Easy Pumpkin

      This is a super easy fall decoration I made out of an old orange shirt and some other fabric scraps. You could use many other types of fabric as well.

      Sew Easy Pumpkin

      • Orange, green, and brown fabric or felt scraps
      • Something to use as a circular template
      • Scissors
      • Needle and thread
      • Something to stuff the pumpkin with
      1. Cut out a large orange circle, a piece of green sleeve to fold over or a smaller green circle, and a brown strip to fold over and use as the stem of the pumpkin.
      2. Sew a loose gathering stitch around the orange circle, begin to pull it tight, stuff the pumpkin, and then finish gathering it together, stitching it closed tightly.
      3. Fold over the piece of green sleeve and gather the unfinished end together, or gather the smaller green circle.
      4. Fold the brown strip together to look like a stem, and stitch it into the green pumpkin top.
      5. Whip-stich the green pumpkin top to the orange pumpkin.

      Sunday, October 23, 2011

      DIY Scrap Wreath

      This is another way to use tiny scraps of fabric to make something beautiful for your home. It is a smaller project than the fabric scrap garland, taking less time and scraps. Again, if you did a lot of seasonal sewing you could make a wreath for every season or holiday for free, if you felt like it.

      Homemade Fabric Scrap Wreath

      • Wire hanger bent into a round shape, florist wire coiled to make a small circle and loop to hang, or a very small/thin wreath form
      • Fabric scraps cut into small strips (I think 1" by 5" to 6" works best)
      • Extra embellishments (ribbon, buttons, etc.)


      Simply tie the fabric strips around the wreath form you have chosen in single or double knots. Continue tying fabric strips, spacing out the colors and patterns fairly evenly, until you like how full the wreath is.  Add any extra embellishments you like, I tied a green fabric tie and sewed a button on this particular wreath. Hang it up, and enjoy your new decoration.

        Saturday, October 22, 2011

        DIY Place Mats

        This is a super easy sewing project that is good practice for a beginning seamstress. By using fabric you already own, clearance fabric, or fabric from a thrift store piece (even something like a high quality sheet or curtain could be re-purposed) you can dress up your table for pennies. A nice set of place mats could make a lovely gift.

        Homemade Place Mats

        • Fabric
        • Coordinating thread
        1. Cut two pieces of fabric into a 13" by 18" rectangle, or use a place mat you already have that you like the size as a pattern, cutting an extra 1/2 inch around the whole piece for a seam allowance.
        2. Place right sides of the fabric together. Pin to secure edges.
        3. Using 1/2 inch seam allowance, sew almost all the whole way around the rectangle, leaving a few inch gap open for turning.
        4. Turn right side out. Pin open edge shut.
        5. Top-stitch gap shut and around the entire place mat to prevent the place mat from bunching or pulling.

          Thursday, October 20, 2011

          DIY Scrap Garland

          This is a great way to use up a ton of tiny scraps of fabric. If you do a lot of seasonal sewing, you might be able to make a garland for each season or holiday if you wanted to. This project is so easy; the only skill required is knot tying. My husband helped with this garland a little bit and Aaron, our three-year-old, really wanted to help. He tried to tie knots for a while, so it was good practice at least. An older child could easily do this project all by themselves.

          Homemade Scrap Garland

          • Fabric scraps cut into short strips (I think 1" by about 5" or 6" works best)
          • A piece of rope, string, or fabric cut longer than you want your finished garland to be (I used a clean old pair of tights cut into a long strip, over 12 feet long, for this garland)
          • Optional embelishments


          Tie the rope or long fabric strip to two chairs or two hooks on the wall to make it easy to tie on the shorter pieces. Begin tying the shorter strips in a single or double knot along the length of the rope. I didn't use any particular pattern, but I did try to space out the colors and patterns fairly evenly along the length of the garland. Continue to fill in the short pieces until you feel like the garland looks full enough. Trim the ends of the rope if necessary and tie in a loop or knot to keep the shorter pieces from slipping off of the ends. Tie on any other embellishments you like (ornaments, ribbons, old spools, etc.). Hang up, or use as you would any garland.

            LinkWithin

            Related Posts Plugin for WordPress, Blogger...